Water bread made with mixer BE-10
by Ibán Yarza (lamemoriadelpan.com, tequedasacenar.com)
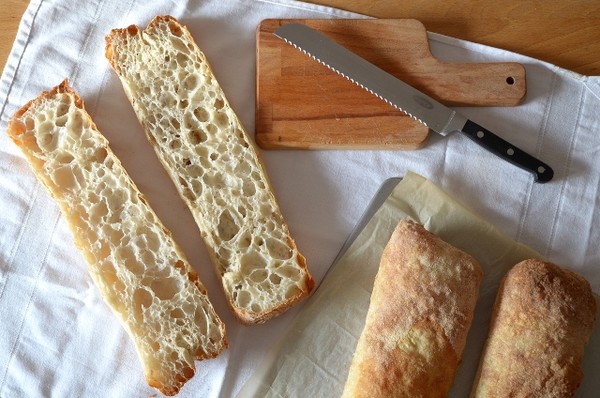
This bread with pronounced alveolation and bright crumb is particularly suitable for the catering sector; it is a succulent and simple bread, which keeps well and when toasted becomes a treat with which to regale diners as they sit at the table.
There is no doubt that having a high hydration bread with an open crumb and extra crispy crust in your range of options is very desirable, but often the fear of high hydration doughs puts off those who are not experts in dough making. However, following a few simple rules, everything will be plain sailing. Apart from that, this recipe has no major complications: there is no sourdough and nothing to put off a novice baker. It is a straight dough which produces a slightly sweet and succulent result.
The small mixers usually found in restaurants are often actually planetary mixers, and the development of the gluten in very hydrated doughs is not exactly their strong point; normally, they struggle to compete with the efficiency of a spiral dough mixer or the greater ability to oxygenate the dough of a double arm mixer, which gives excellent results in very hydrated dough. However, small blenders (the bread in the picture was made with a Sammic BE-10) have a secret weapon: depending on the type of dough you can change the accessory that comes into contact with the dough. And that is the crux of the matter: with a dough hook, when the hydration is very high, the mixer will usually have difficulty giving shape to the dough. The solution is as simple as fitting the mixer blade and increasing the kneading speed a little: this will oxygenate the dough a bit more and strengthen the gluten. With the use of a good quality strong flour and being a little methodical, the result is guaranteed. Finally, handling the dough with durum wheat semolina before baking adds a wonderful sweetness, a hint of roasted corn and an extremely appetising appearance.
Dough
- Very strong flour (W300 – 400) 1000 g
- Water 900 – 1000 g (750 g at room temperature and another 200-250 g from the fridge
- Salt 22 g
- Yeast 5 g (1.7 g if it is dried)
For the handling
- Oil
- Fine durum wheat semolina (may be the type used to batter fish).
- Put the flour and 750 g of water in the bowl (reserve the rest of the water for when the dough has taken shape). Knead for two minutes at the first speed, simply to mix the ingredients well.
- Kneed for 10 minutes at speed 3.
- Kneed for 10 minutes at speed 2. During these 10 minutes, add the remaining water a little at a time up to a total of 900 to 1000 g of water; depending on the absorption and strength of the flour you can add more water (the bread in the photo has a hydration of 100%: 1 kg of flour for 1 kg of water). If the dough is too hot after the first two steps, this can be corrected in this step using water from the refrigerator.
- Knead for 10 minutes at speed 5, and at the end of this step add the salt and the yeast.
- Kneed for 20 minutes at speed 5. Normally, before finishing this step the dough tends to break away from the bowl and make a distinctive sound when hitting the bowl in each turn. The dough is almost ready.
- Knead for another 5 to 10 minutes at speed 5 if necessary, until you note that the dough becomes elastic, gaining strength.
- Transfer it to a lightly oiled rectangular tray. For these amounts, a Gastronorm ½ of 6.5 litres is ideal. When you put the dough in the tray, the volume will be little more than a litre, but by the time it goes in the oven it must be more than 4 litres.
- Ferment at around 24° C for about 5 to 5 ½ hours. After the first hour of fermentation, make a fold in the dough give it body (the folding can be repeated later if the dough lacks strength).
- Sprinkle the work surface with lots of fine semolina; tip out the dough by turning over the tray, sprinkle with more semolina and cut long ciabattas with a metal scraper. Very delicately (and avoiding degassing the pieces), transfer them to a sheet of baking paper.
- Bake in an oven with steam at 250° C for 10 minutes. Ideally, the oven will have a metal tray that is already hot to give a good thermal blast to the dough and help it rise more. After this time has passed, remove the steam, open the vent and reduce the temperature to 200° C, and cook for another 30 minutes, until a good crust forms.
- Allow to cool before cutting. At this point you can freeze in airtight bags, preventing the freezer from drying out the bread. To regenerate, use the toaster or a salamander stove.
